The first time I saw a 3D printer was during my manufacturing internship at Whirlpool and I was totally fascinated by it. I would start a print and stare at the contraption endlessly as it glued layer upon layers of plastic to create an object out of thin air. As a manufacturing engineer now, if I need a new bracket or a fixture, or I have to a prototype a new design for a tooling, a 3D printer comes to my rescue. It offers me a quick and an effective solution instead of waiting for days to get the same part from a machine shop.
How does a 3D printer actually work?
Although there are different type of 3D printers, the one that I get to work on is an Ultimaker S5, that functions on the Fused Filament Fabrication (FFF) principle. As the name suggests, it fuses together the plastic filament that forms a print.
The plastic filament material is a long wire about 3mm in diameter that is spooled in a roll. It is first heated to a high temperature into a semi-solid state and pushed out of a nozzle to sketch a drawing pattern on the glass build plate. The moment the molten plastic touches air, it cools down and turns back into solid.
This is similar to writing with a ball pen where the ink is pushed onto the paper that dries as you write. After one layer is printed, the build plate moves down and the next layer prints on top of previous layer and fuses together as it cools down. This process and pattern is repeated as needed to finally build an object.
Lessons I learned along the way.
Initially, I started using the 3D printer on its default settings, but my curiosity pushed me to try and experiment with different settings. There are a multiple different settings to adjust on the printer that dictate the print quality and time to make it better or worse. As I tried several combinations, I made mistakes and ran into some problems, but ultimately figured out how to get consistent results. Over the last 3 years that I have used the 3D printer, there have been several complex lessons learned. However, these are top 3 basic settings that can help a beginner to get better results with 3D printing.
- Material Selection is important!

When printing a part, it is very important to pick the right material for the application. Ultimaker has a guideline for material selection based on their testing results but my experiences have slightly varied. Nylon has been my best friend to print with over ABS because it has better resistance to wear and impact. A lot of my applications have objects hitting my brackets, and Nylon has given me the best results.
Although ABS is built for functional prototypes, it is a nightmare to print with, it sticks to the glass build plate like a leech would stick to your leg, if you were to use force to take it off, it is painful. I have ended with a shattered glass plate and multiple failed prints with ABS.
- Print infill and pattern determines the part characteristics!
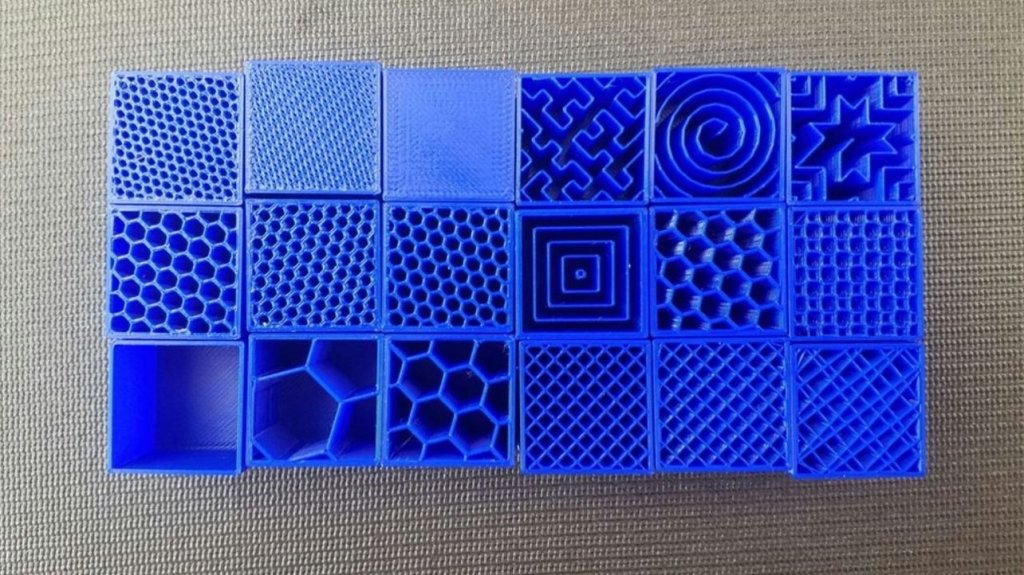
Infill patterns 
Infill Percentages
The print infill percentage is the density of the material that needs to be between the walls of a part. The more infill you have the more material its going to need and therefore more time to print. A print with a 20% infill will print faster but will not have as much strength as an 80% infill print that takes longer to print.
The strength of the part is also dependent on several other factors as well, one of them being infill pattern. As I became familiar and printed more with different patterns a I learned a few lessons that a Cubic 3D pattern will provide strength in all directions while consuming the least amount of material. A circular pattern will give faster and precise prints when printing cylindrical objects.
Although there are several patterns to choose from, Cubic 3D pattern with 60% infill is my go to setting when printing
- Support material helps with part complexity!
Ultimaker S5 has the ability to print a support material along with the normal print material. This support material is a water soluble PVA and forms a base for any overhanging structure in the object. The presence of a support material also gives the 3D printer to print complex shapes like this as one single piece, which would be impossible to manufacture in a machine shop. Depending on the quantity of the support material needed, a part can be soaked overnight in water to dissolve and clean the support material off the print.
Improve, and Repeat.!
You can adjust several available parameters to balance the trade-offs between the print quality, print time, part strength etc. The cheaper costs of prototyping using an FFF 3D printer gives you the ability to try several iterations for getting the right part. These iterations can depend on the need to prototype for a functional check or just for visual accuracy.
To sum it up, with a 3D printer you can make cool stuff as many times you want, make mistakes, learn from the mistakes and print new stuff, without burning a hole in your pocket. You can also print functional parts that are readily available, light weight, and with similar physical properties to a metal part. Which is why I believe that 3D printers ROCK.!


